Jordan Shoe QC: Sole and Heel Symmetry
Inside this note
# Jordan Shoe QC: Sole and Heel Symmetry  This article focuses on the fashion-reps product "[Jordan](https://fashion-reps.net/brand/jordan) Patent-Leather Basketball Shoe With a Carbon Midfoot Plate," explaining how to access View QC Photos from the product detail page and then use sole patterns, heel symme
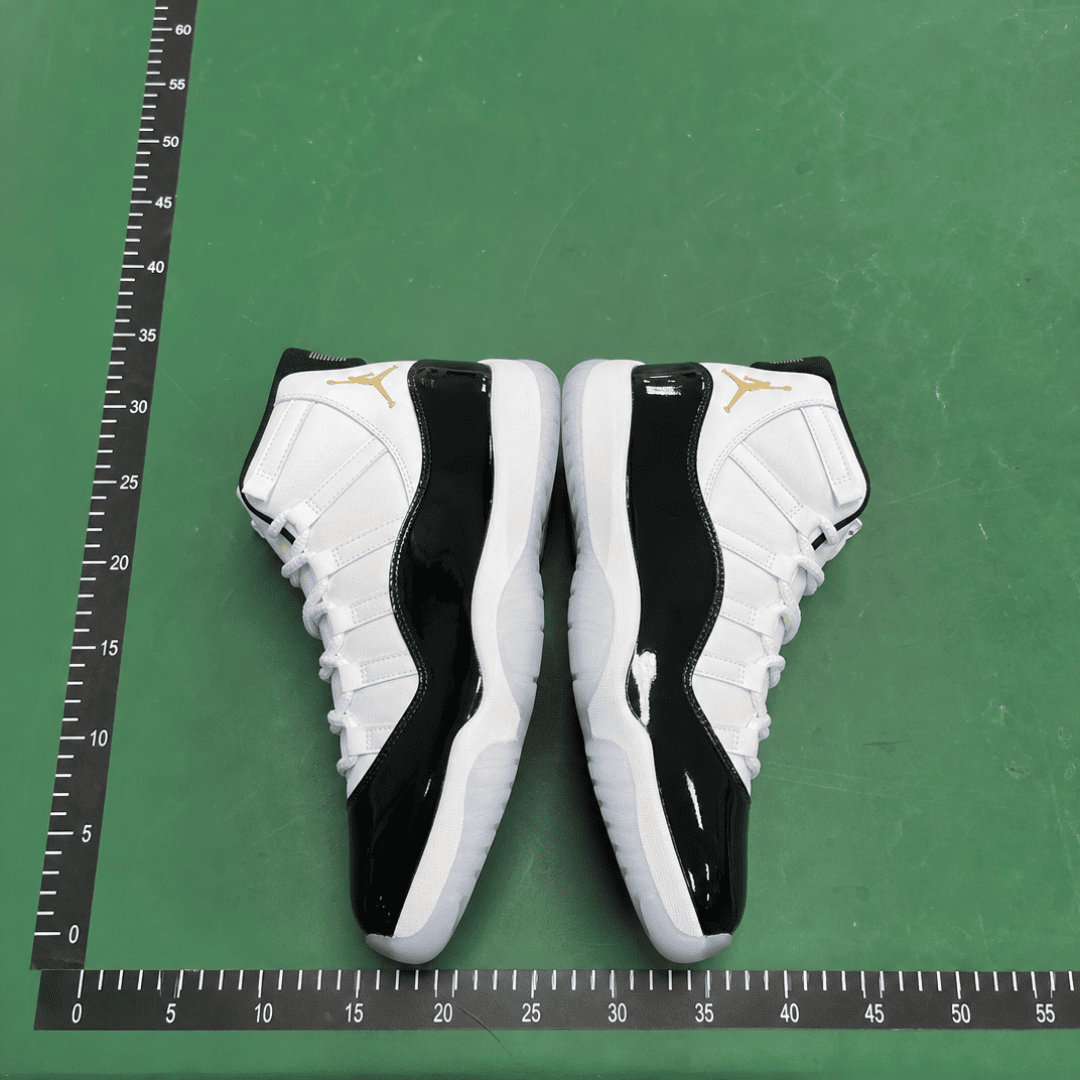

This article focuses on the fashion-reps product "Jordan Patent-Leather Basketball Shoe With a Carbon Midfoot Plate," explaining how to access View QC Photos from the product detail page and then use sole patterns, heel symmetry, upper stitching, and visible flaws to decide whether to confirm, request a reshoot, or hold off. It reviews image evidence, not authenticity, and does not guarantee quality. 🔍
Page data describes the product as a Jordan 11-style basketball shoe with patent leather upper, translucent outsole, and carbon fiber midfoot plate, with size range listed as 36–47.5. The page also reminds that specifications, price, stock, size availability, and service fees should be confirmed before ordering. The fact-check date for this article is October 8, 2026.
What Shoe Decision This QC Check Addresses
The core question is not "Does this shoe look like an authentic one?" but rather: Are the current QC photos sufficient to confirm this specific item, or do you need to request additional photos from the seller before deciding?
After reviewing, you should be able to take one of three actions:
- Confirm: Left and right shoes, soles, heels, and main stitching areas have no issues that meet your standard for return or reshoot.
- Request a Reshoot: Photo angles, clarity, or coverage are insufficient to judge key areas.
- Hold Off: You've spotted issues that may affect appearance, structure, or size assessment, and you need to understand the return window and seller's handling process first.
This method does not apply to pages with only generic product images and no specific QC photos for the item, nor to using images for authenticity checks, internal materials, or long-term durability. Images can only show visible appearance evidence at the time of shooting.
Accessing View QC Photos on the fashion-reps Product Page
First open the product detail page above and confirm the page title matches the target product. Do not infer QC status from the homepage, Jordan brand page, category page, or other product images. On the product page, find the button labeled View QC Photos and enter the QC gallery for this specific item.
When checking, it's advisable to first record the following:
- Whether the product name matches the item in your order.
- Whether the color and style match the version you intend to purchase.
- Whether the size matches your order selection.
- Whether the images show the same pair of shoes, not a different batch or reference images.
- Whether you can see both left and right shoes, not just one shoe.
- Whether there are sufficiently clear close-ups of the soles, heels, upper, and collar.
If the page only has generic display images, or the images cannot confirm the specific item, you cannot treat them as QC evidence for these shoes. In that case, request additional images first instead of confirming based solely on the product title or catalog description. 📷
How to Compare Color, Size, and Left/Right Shoe Information
For color, first check if the overall tone matches your order selection, then look for obvious color differences in areas like patent leather, upper, sole, and laces. Screen brightness, lighting, and background color can affect perception, so slight color differences should not alone be a reason for return; however, if there are clear inconsistencies between left and right shoes or different sides of the same shoe, request a reshoot under natural light or a more neutral background.
For size, don't rely solely on the size printed on the sole. Also check the shoe box label, tongue label, or any size information the seller can provide against your order. The page lists sizes 36–47.5, but page data indicates some intermediate sizes may be missing, so actual availability should be re-confirmed at order time or warehouse confirmation.
Treat left and right shoes as a pair:
- Check if toe box heights are roughly consistent.
- Check if collar opening and tongue position are obviously skewed.
- Check if heel height, outline, and branding areas are roughly symmetrical.
- Check if sole patterns belong to the same model and there are no obvious misalignments or abnormal gaps between left and right.
- Check if differences in patent leather sheen are due to camera angle only, or still clearly different under the same lighting.
Symmetry doesn't mean the two shoes must be identical like machine replicas; it's a tool to spot anomalies that need a reshoot. Minor manual errors, different positioning, or lens perspective should be ruled out first with front, side, and top-down photos.
How to Check Sole Patterns, Edge Coverage, and Left/Right Symmetry
The sole is a priority area in this product's QC photos. First confirm that the left and right outsoles have the same pattern design, then look for breaks in the pattern edges, obvious missing glue, incomplete coverage, or large positional differences between left and right.
Check in the following order:
- Start with full sole images to confirm the overall shape and extent of the translucent outsole on both left and right.
- Examine toe, forefoot, arch, and heel areas, comparing pattern direction and edge finishing.
- Check the seam between midsole and outsole for obvious interruptions, glue overflow, or partial lifting.
- When left and right shoes are placed at the same angle, observe if the outsole edges appear uneven or tilted to one side.
- For areas that cannot be seen clearly, request vertical close-ups; do not draw conclusions based solely on angled photos.
The product page describes the outsole as translucent and mentions that translucent outsoles on such models may yellow over time. This is a long-term usage risk at the model level, not a confirmation of a specific color in the current QC photos. If current images cannot accurately show the translucent parts under neutral lighting, record it as "color and condition pending reshoot" rather than directly concluding yellowing or quality issues.
For heel symmetry, look at contour, stitching, and the relative position of heel tabs, not just whether the branding is centered. If one shoe is placed more forward, perspective can create false deviations. For a reshoot, both shoes should be side by side, heels facing the camera, camera level, and using similar distance and lighting.
| Visible Evidence | What It Can Support | What It Cannot Directly Support | Recommended Action |
|---|---|---|---|
| Left and right sole patterns roughly match, edges are continuous | Appearance consistency is tentatively acceptable | Authenticity, internal structure, or long-term durability | Continue checking upper and heel |
| Heel contours clearly asymmetrical at same angle | Need further confirmation of appearance deviation | Definite structural damage | Request direct rear close-up, hold off if necessary |
| Clear gaps, lifting, or excessive glue overflow at sole/midsole seam | Visible appearance issue exists | Whether the issue can improve with wear | Save original images and inquire about return handling |
| Images blurry, excessive glare, or only one shoe shown | Insufficient evidence | No problem or definite problem | Reshoot before deciding |
How to Record Visible Issues in Upper Stitching, Collar, and Heel Structure
Upper inspection should separate "visible flaws" from "material judgment." You can note if stitching is obviously off-course, seams are uneven, patent leather has clear scratches or impressions, or collar heights differ noticeably between left and right. But you cannot describe glare in images as material damage, nor treat unseen internal padding or carbon fiber midfoot plate as verified.
Record by area:
- Toe box: Check left and right toe heights, patent leather edge, and forefoot seam consistency.
- Upper: Check fabric seams, stitching lines, and print positions for continuity; look for visible stains, scratches, or wrinkles.
- Collar: Check if tongue, lining, and opening are obviously skewed; do not judge wearing comfort from an angled photo alone.
- Heel: Check heel tab, stitching, contour, and branding area for obvious shifting.
- Hardware or decorative elements: If there are metal eyelets, buckles, or other decorations, check for missing, crooked, scratched, or unequal counts between left and right.
Each issue should include location and severity, e.g., "clear stain near the seam on the outer right heel," not a vague "poor workmanship." If unsure whether it's dust, glare, or surface damage, write "image cannot rule out surface flaw; need close-up to confirm." 📝
What Judgments Can Only Be Image Evidence, Not Authenticity or Overall Quality
QC photos can help you assess visible appearance at the time of shooting, but cannot prove:
- The item is authentic or authorized by a brand.
- All materials described on the page are used inside the shoe.
- Carbon fiber midfoot plate, air cushion, or other internal structures have been verified.
- The shoe is comfortable, definitely true to size, or suitable for wide feet.
- The translucent outsole will not yellow in the future.
- Minor glue marks, impressions, or color differences won't change after shipping.
- The seller will accept returns, or the platform will cover related costs.
The page lists a reference price of $44.98, but final product price, service fees, and international shipping should be based on the checkout information from your chosen shopping agent. Prices and policies are time-sensitive; just because QC photos show no issues does not mean return costs are zero.
If you're concerned about fit, combine order size, foot length measurements, and seller size info; don't use heel symmetry as evidence of correct size. If you're concerned about customs, shipping, or returns, separately check destination country regulations, agent platform terms, and order status.
What Angles and Details to Request in a Reshoot
Reshoot requests should be specific about angles, areas, and purpose, avoiding vague "please take clearer photos." You can ask the seller or warehouse for:
- A front view with both shoes side by side, to compare toe height, color, and upper stitching.
- A direct rear view with both shoes side by side, to check heel contour, stitching, and branding position.
- Vertical close-ups of both shoe soles, to compare patterns, translucent outsole, and edge coverage.
- Close-ups around the entire seam between sole and midsole, to confirm any clear gaps, lifting, or glue overflow.
- Photos of collar, tongue, and inner labels, to verify size information and left/right structure.
- Natural light close-ups of suspected flaw areas, with a full shoe photo as position reference.
- If outsole color is a concern, request photos of both shoes under same neutral lighting without strong colored lights.
When requesting a reshoot, do not ask for screenshots containing full names, addresses, phone numbers, order numbers, or payment information. If images include shipping labels or account details, blur personal information first, keeping only the areas needed for product assessment. 🔒
Final Action: Confirm, Reshoot, or Hold Off on This Order
Use the following decision sequence:
- Confirm product name, color, size, and QC photos belong to the same item.
- Compare left and right sole patterns, outsole edges, and heel contours.
- Check upper stitching, collar, seams, prints, decorations, and visible flaws.
- Distinguish between issues you've seen, issues the images cannot clarify, and matters photos cannot prove.
- If key areas are missing or overly reflective, request a reshoot; don't treat insufficient evidence as no problem.
- If there are clear structural appearance issues or information that doesn't match your order, hold off and ask the seller and shopping agent about feasible options within the return window.
If left and right sole patterns and heel contours appear roughly consistent in same-angle photos, the upper has no unacceptable visible flaws, and color, size, and product info all match your order, you may consider confirming. But this only means current images don't show appearance risks you've set; it doesn't guarantee authenticity, internal structure, or long-term quality.
If a reshoot reveals issues are just camera angles, dust, or explainable minor differences, the cost of a reshoot is usually waiting time and possible storage or processing delays; if you insist on confirming, you bear later return, reshipping, and time costs. Conversely, holding off or requesting handling may increase communication time and extra fees, but can reduce the risk of receiving a product with obvious appearance issues that require repair or return later.
Those who should request a reshoot before deciding are buyers who care about sole patterns, heel symmetry, patent leather appearance, and order matching, and are willing to wait for more complete evidence. If you accept minor manual variations, only focus on basic style, and the seller's return window and fees are clear, existing photos may be sufficient for a personal decision. If you need authenticity guarantee, internal material proof, absolute flawlessness, or confirmed long-term durability, it's not advisable to order based solely on this set of QC photos.
Article Image
Community feedback
1 approved
Reader score 5 / 5 (1 rating)